
Here you’ll find an easy step-by-step tutorial for a camera drawing.
It’s perfect for kids, parents, and anyone who loves to draw!
Today we will learn how to make a fun and simple camera drawing.
This guide is great for beginners and young artists.
Kids will practice shapes, lines, and coloring skills while drawing a cool camera.
Drawing a camera is fun because it uses clear shapes like circles and rectangles.
With each step, the picture becomes brighter and more detailed.
Let’s get started!
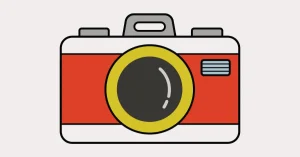
Preview of the Step-by-Step Camera Drawing Tutorial

Drawing Materials
• Pencil
• Eraser
• Black marker (optional)
• Crayons or colored pencils
Coloring Options
You can color your camera any way you like.
Try red, yellow, or blue for bright and bold colors.
Use crayons for soft colors or markers for strong and dark colors.
Kids can also add stickers or designs to make it unique.
Paper
Use A4 drawing paper or sketchbook paper.
Thicker paper works well if you plan to use markers or paint.
Step-by-Step Camera Drawing Guide
Below are easy steps based on the image you uploaded.
Follow each step slowly, and try to enjoy the drawing process.
Step 1: Draw a rounded rectangle.
Make a large rounded rectangle in the middle of your page.
This will be the main shape of your camera.

Step 2: Add two light guide lines.
Draw one thin line near the top and one near the bottom of the rectangle.
These help shape the body of the camera.

Step 3: Add the top panel and a small rectangle.
Draw a small rounded shape at the top to form the handle and buttons.
Then add a small rectangle on the right side for the vent or flash area.

Step 4: Draw a big circle for the lens.
Place a large circle near the center of the camera.
This circle will become the lens.

Step 5: Add inner circles to the lens.
Draw another circle inside the big one.
Then add one more small curved line to show shine inside the lens.

Step 6: Fill the lens with the dark outline.
Make the inner circle dark to look like a real camera lens.
Keep a small white shine shape inside for a glossy effect.

Step 7: Add the yellow ring around the lens.
Draw a thick ring around the lens and color it yellow.
This gives the camera a bold and fun look.

Step 8: Add red color to the camera body.
Color the middle area of the camera red.
Leave the top and bottom white to match the design in the picture.

Step 9: Add the final details.
Color the small vent on the right side.
Check your lines and add a black outline if you want a clean, bold finish.

Final Touch / Conclusion
That’s it! Now you have your very own camera drawing.
You can add stickers, patterns, or even a name tag to make it special.
Have fun showing it to your family and friends.
Great job and keep drawing every day!
FAQs
Q1: How can kids draw a camera easily?
Kids can start with simple shapes like rectangles and circles.
They can follow this step-by-step guide to keep it quick and fun.
Q2: What tools do kids need for a camera drawing?
Kids only need a pencil, paper, and crayons.
A marker helps make bold lines but is optional.
Q3: How long does it take to draw a camera?
Most kids can finish this camera drawing in 10 to 15 minutes.
They can color it longer if they want to add more details.
Q4: Can beginners follow this camera drawing tutorial?
Yes! This guide is very simple and uses clear steps.
It is perfect for first-time artists.
Q5: Can kids use any colors for the camera?
Kids can use any colors they like.
Bright colors make the camera look fun and creative.