
Here you’ll find an easy step-by-step tutorial for a flower drawing.
This simple guide is perfect for kids, parents, and beginners!
Drawing flowers is relaxing and fun. Kids love the bright colors, smooth shapes, and simple lines.
In this guide, we will learn how to draw a cute flower pot filled with tulips.
Your child will learn shape building, line control, and color play in a very easy way.
This flower drawing tutorial is great for home, school, or art class.
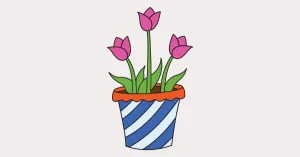
Preview of the Step-by-Step Flower Drawing Tutorial

Drawing Materials
• Pencil
• Eraser
• Black marker (optional)
• Coloring pencils, crayons, or markers
Coloring Options
You can color the tulips pink, purple, red, or yellow.
Try green for the leaves and stems.
Use bright or soft shades—both look great.
Kids can also make stripes, dots, or fun patterns on the pot.
Paper
Use a sketchbook page or standard A4 drawing paper.
Any smooth paper works well for kids.
Step-by-Step Flower Drawing Guide
Step 1: Draw the top of the pot
Start by drawing a flat oval.
This will be the top opening of your pot.

Step 2: Add the pot shape
Draw two lines that angle down from the oval.
Connect them at the bottom with a curved line.
Add a wavy line around the top to make a cute edge.

Step 3: Draw the flower buds
Above the pot, sketch four small tulip shapes.
These look like simple rounded triangles with soft points.

Step 4: Add the stems
Draw long, thin lines from each bud down to the pot.
Make them straight and light.

Step 5: Add the leaves
Now draw long curved leaves on each side of the stems.
They should spread out to fill the pot.

Step 6: Add pot stripes
Draw curved diagonal lines across the pot.
These make a fun striped pattern.

Step 7: Add color to the flowers
Color each tulip.
In the sample image, the flowers are pink and purple.

Step 8: Color the leaves
Use green for all the leaves and stems.
Keep the strokes soft and smooth.

Step 9: Add color to the pot edge
Color the top edge of the pot orange (or any color you like).

Step 10: Color the pot stripes
Color the stripes blue and white or mix your own colors.
You now have a bright and beautiful flower pot!

Final Touch
That’s it! You have learned how to make a cute flower drawing in a fun and simple way.
Now share your art with family or hang it up for display.
Try drawing more pots with new colors and shapes!
FAQs
Q: How can kids easily draw a flower drawing?
A: Start with simple shapes like ovals and lines. Follow each small step and keep the lines light. Add color at the end to finish the art.
Q: What colors look best for tulips?
A: Kids can use pink, red, yellow, or purple. Any bright color works. Let them pick what they like.
Q: What can kids add to make the pot look fun?
A: Kids can draw stripes, dots, zigzags, or stars. This makes the pot look bright and playful.
Q: Is this flower drawing good for beginners?
A: Yes. The steps use easy shapes and slow changes. Kids can follow along with no stress.
Q: What tools work best for coloring the pot?
A: Crayons and markers are great. Kids can mix both to make bold shades.