Here you’ll find an easy step-by-step tutorial for how to draw a house. Perfect for kids and beginners! Follow the simple shapes and learn how to draw a cute house in no time.
Drawing a house is a fun way for kids to practice shapes and lines.It helps build hand control and boosts creativity.In this guide, kids will learn how to draw a house with a roof, windows, and a door.Each step is simple and clear, so everyone can follow along.
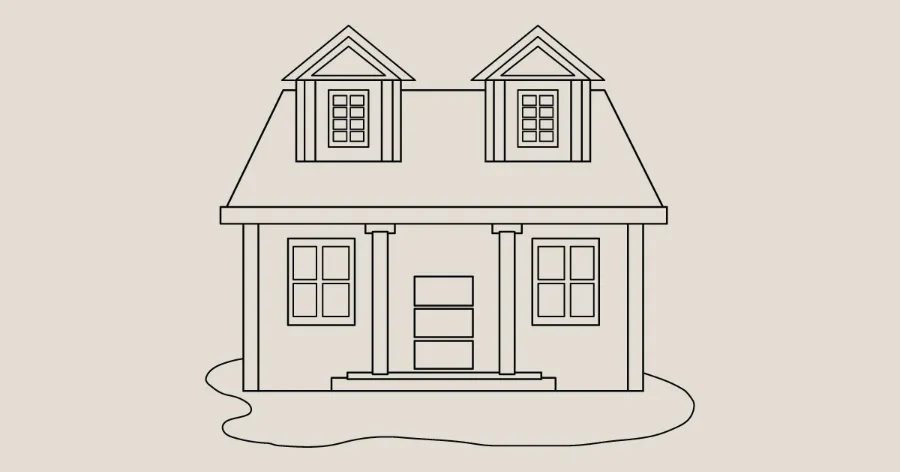
Preview of the Step-by-Step House Drawing Tutorial

Drawing Materials
You only need a few items to get started:
- Pencil
- Eraser
- Coloring pencils or crayons
- Black marker (optional)
Coloring Options
- You can color your house any way you like.
- Try soft colors like light blue, yellow, or pink.
- Use crayons for smooth shades or markers for bold, bright colors.
- Kids can also add trees, grass, or clouds to make a full scene.
Paper Recommendation
- Use sketchbook paper or simple A4 drawing paper.
- Both work great for pencil and crayon drawings.
Step-by-Step House Drawing Guide
Use the steps below to draw the house shown in the preview image.
Step 1: Draw a long rectangle with two straight lines below.
This makes the top beam and the two side posts.

Step 2: Add a roof shape.
Draw a wide roof over the top beam. Make the roof point up a little.

Step 3: Add two tall columns.
Place the columns under the roof. Add a small platform at the bottom.

Step 4: Draw a small roof room on top.
Add a small box shape and a tiny roof on the big roof. This will be the first upper window area.

Step 5: Add a second rooftop window.
Draw the same shape on the other side of the roof. Now you have two upper window rooms.

Step 6: Draw the big windows on the lower floor.
Add two square windows on each side. Split them into smaller panes with simple lines.

Step 7: Add details to the rooftop windows.
Draw little square panes inside each upper window. This makes the house look more real.

Step 8: Draw the door and ground area.
Add a door in the center with three small panels. Then draw a curved line for the ground.

Final Touch
That’s it! You have learned how to draw a house step by step. Now you can color your picture in bright and fun shades. Show your masterpiece to your family or hang it on the wall!
FAQs About House Drawing Ideas for Kids
Q: How can kids draw a house easily?
A: Start with simple shapes like lines, squares, and triangles. Then follow each step in this guide to build the house piece by piece.
Q: What should kids use to color the house drawing?
A: Crayons, markers, or colored pencils all work well. Kids can mix colors to make the house look bright and fun.
Q: Can beginners follow this house drawing guide?
A: Yes! This guide uses small steps and easy shapes, so anyone can try it.
Q: How long does it take to draw a house?
A: Most kids finish in 10–20 minutes. Take your time and enjoy the fun steps.
Q: Can kids add more things to the picture?
A: Yes! They can add trees, flowers, pets, or even people to make a full scene.